Guide
The online designer, simply explained
With the folie.ch designer you create T-shirts, hoodies, caps, signs, stickers, stamps and vehicle lettering right in your browser – on your phone or computer, without an account. This guide shows you with pictures where everything is, how to use text, logos, slogans, graphics and templates – and how to avoid the most common mistakes.
At a glance
- Devices
- phone, tablet and computer
- Account
- not needed
- Slogans
- over 14,000, in 5 languages
- Graphics
- over 4,000, any colour
- Templates
- around 1,200 ready-made designs
- Saving
- automatic, in your browser
- Price
- shown while you design
Your design in 4 steps
- Choose a productClick “Design now” at the top and pick: shirt, hoodie, cap, sign, sticker, stamp or vehicle.
- DesignType some text, upload a logo, or choose a slogan, a graphic or a ready-made template.
- CheckTap “Preview” to see it without guide lines. Read your text twice and keep an eye on the print quality.
- OrderTap “Next”, choose sizes and quantities and place your order. For vehicles, you send a quote request.
The designer at a glance
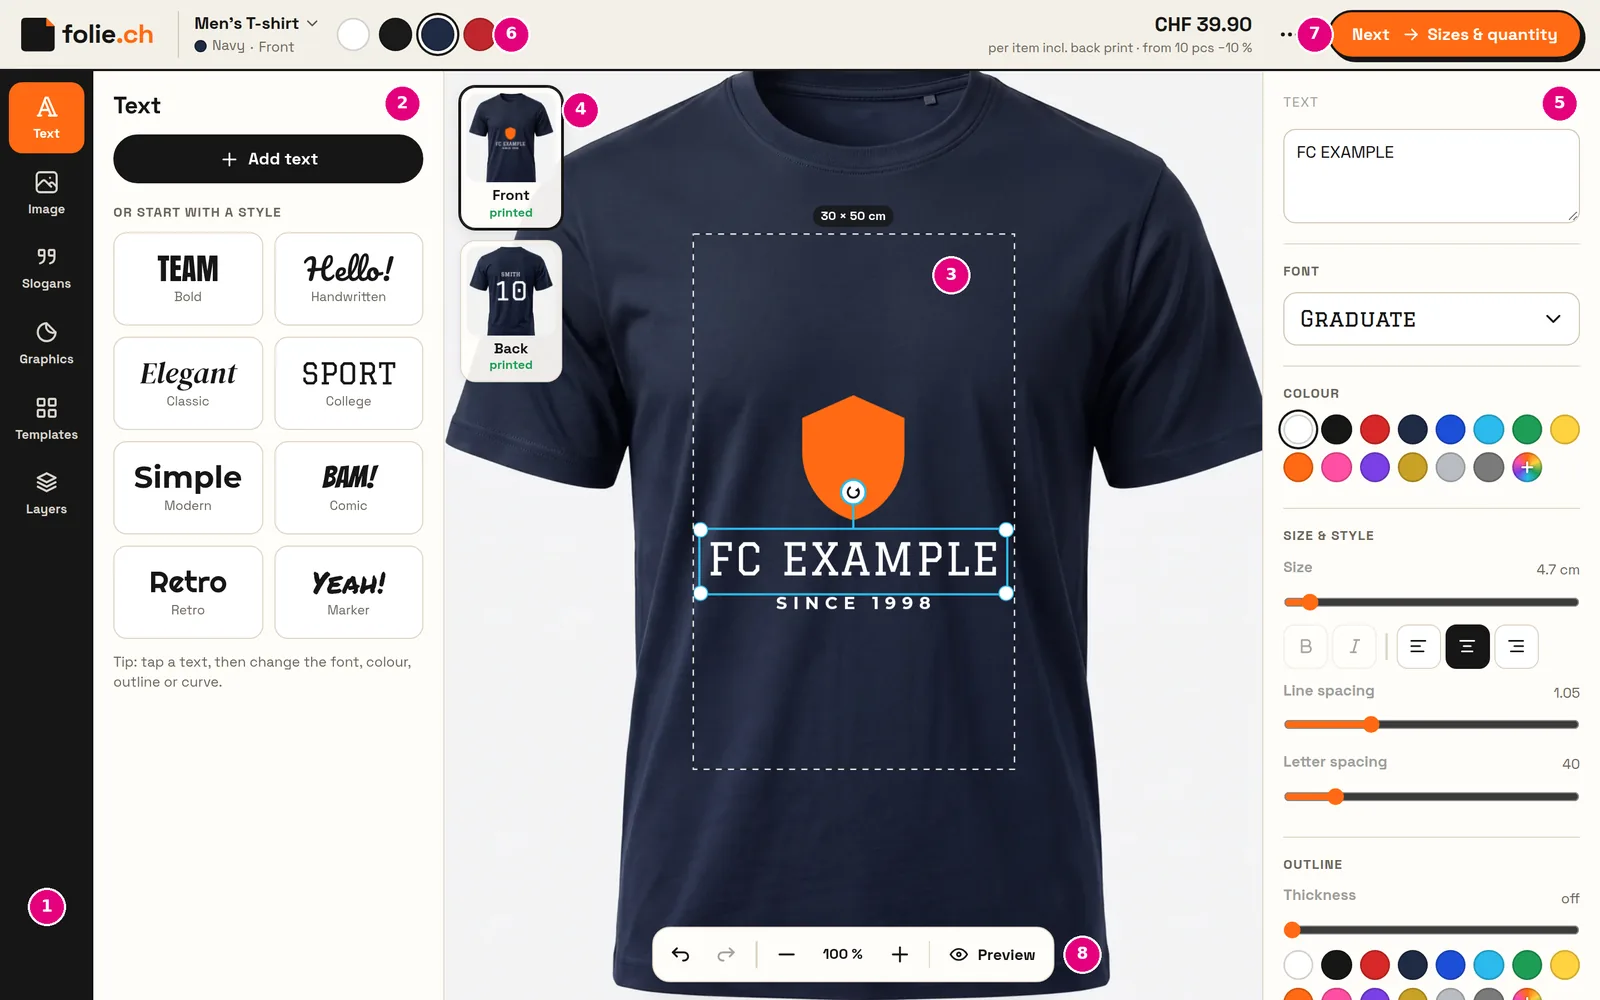
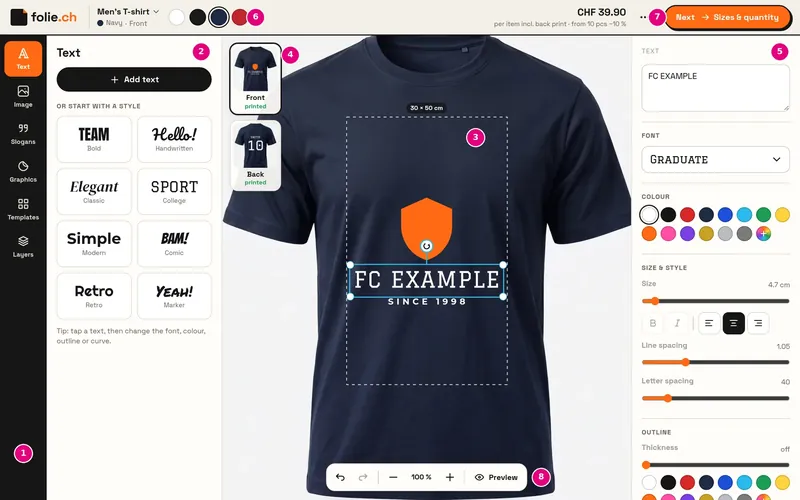
- Tools: Text, Image, Slogans, Graphics, Templates and Layers.
- Tool panel: this is where you choose what to add.
- Design area: only what lies inside the dashed line is printed. The maximum print size is shown at the top.
- Sides: Front, Back (for vehicles, all four sides). Tap to switch sides.
- Properties: for the selected element – font, colour, size, arrange, delete.
- Product colour (shirt colour or vehicle colour).
- Price and “Next” to order or request a quote.
- Undo, zoom and preview.
Designing on your phone
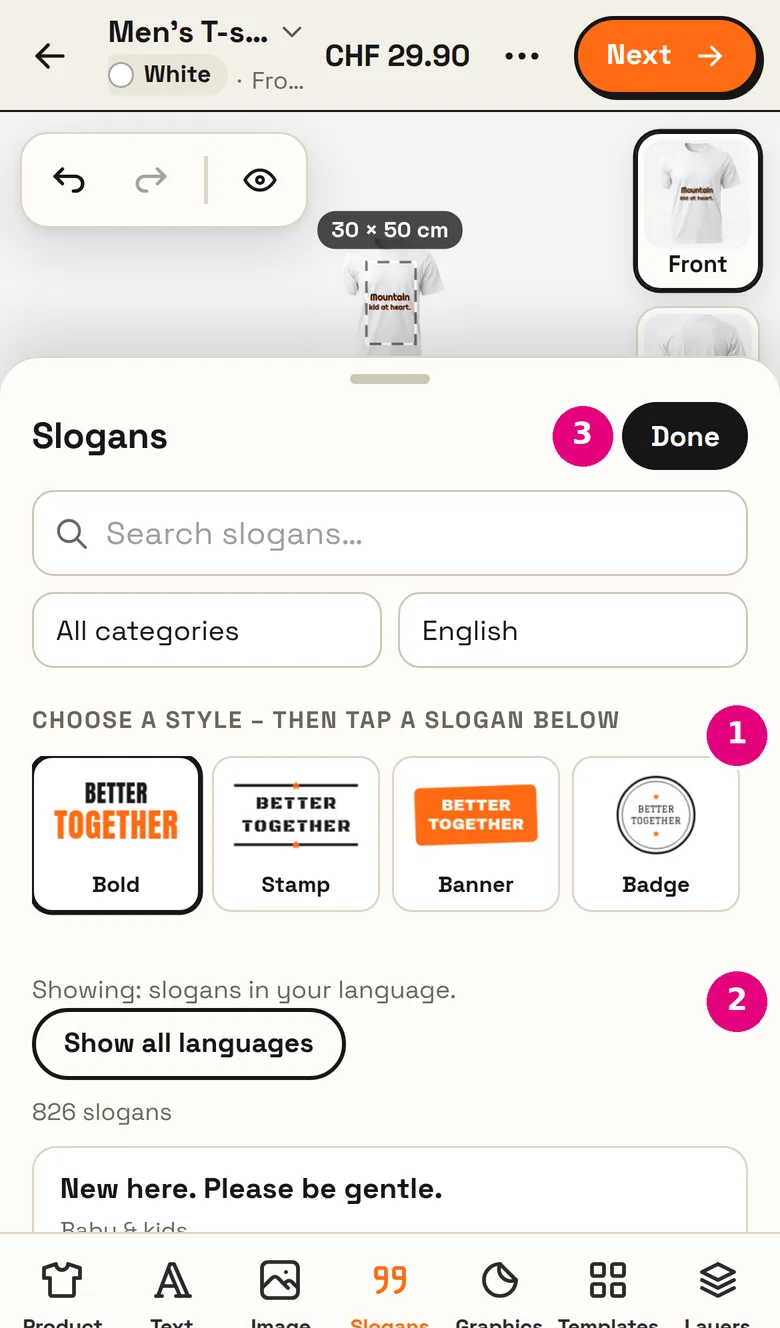
On a phone, the tools are at the bottom. Each tool opens as a panel from the bottom – tap “Done” to close it again.
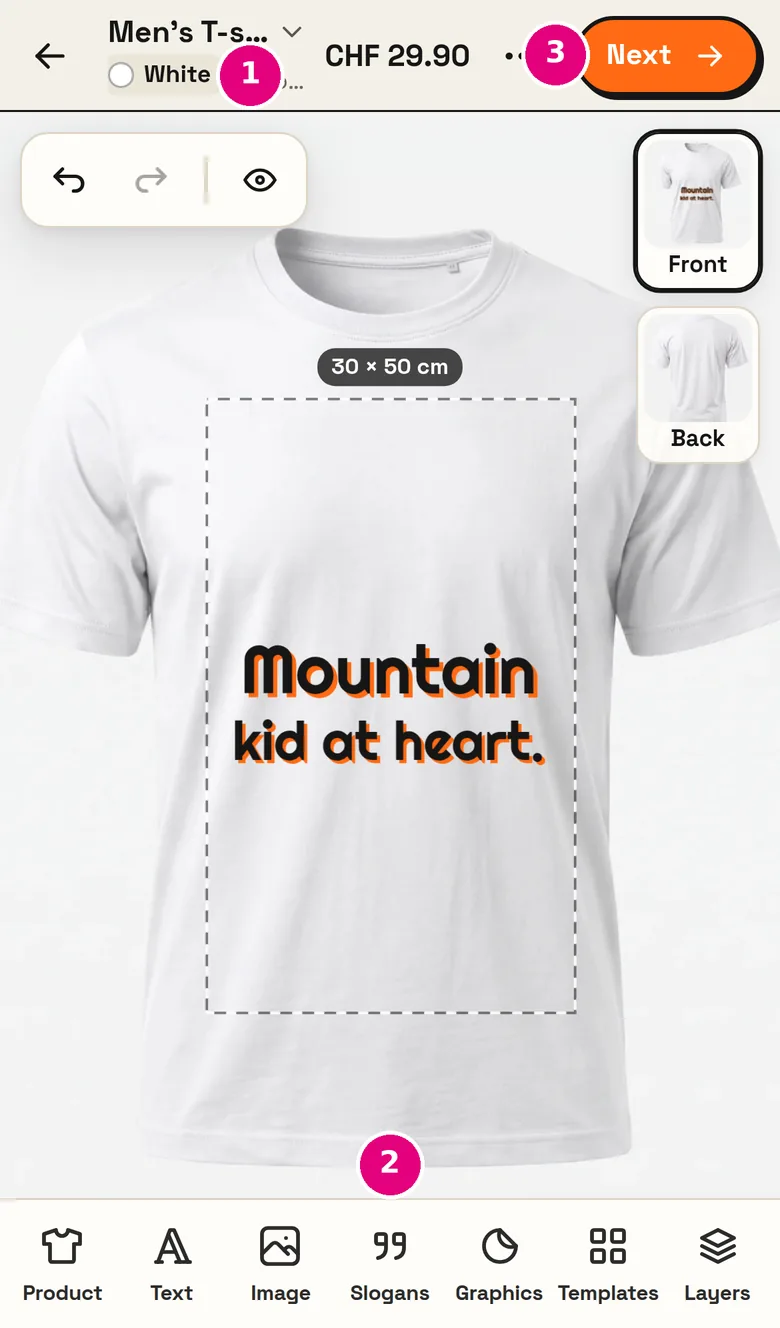
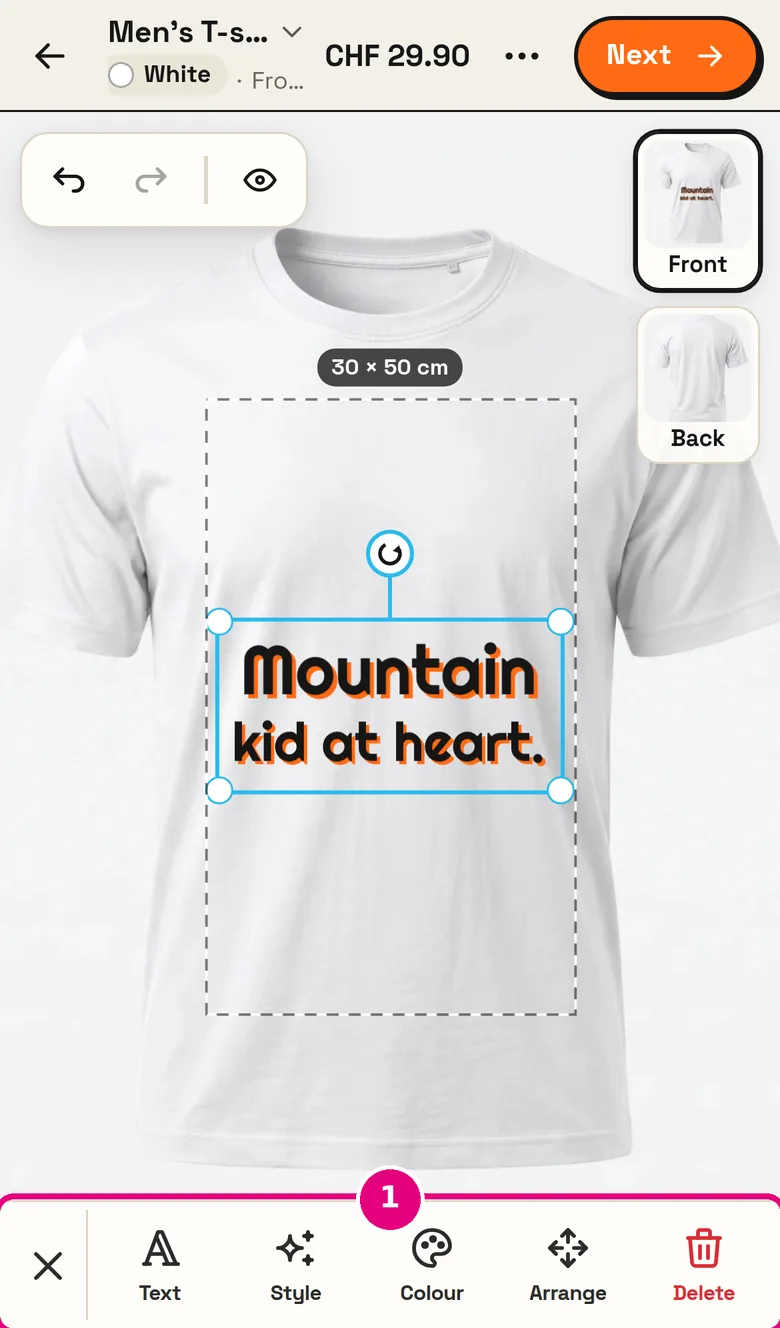
- Edit an element: tap it – a bar appears at the bottom with Text, Style, Colour, Arrange and Delete.
- Move and resize: drag with one finger, pull the corners to make it bigger or smaller, rotate with the round handle.
- Product colour: tap the colour dot next to the product name at the top (e.g. “● White”).
Adding and styling text
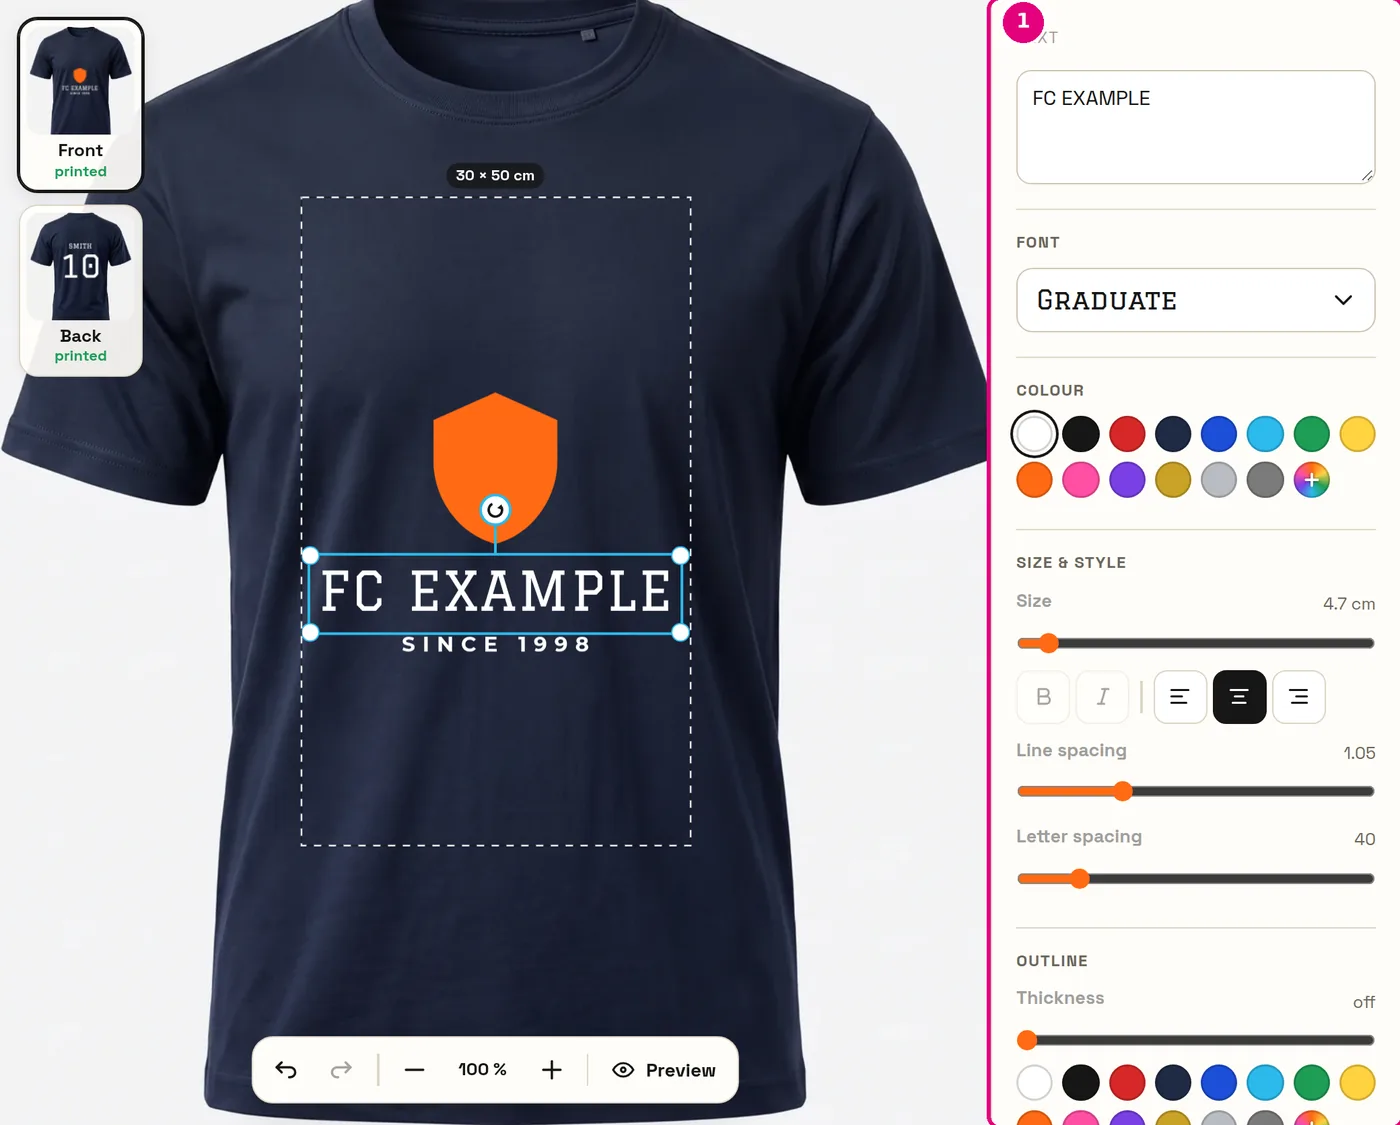
- New text: “Text” → “Add text”, or tap one of the quick-start styles (Bold, Handwritten, College …).
- Change text: tap the text and type in the text box at the top – or double-tap the text.
- Nice effects: Outline (a border in a second colour) and Curve (text in a semicircle, ideal for crests and badges).
- 29 fonts: from plain to handwritten. For stamps and vinyl lettering, go for bold fonts.
Uploading a logo or photo
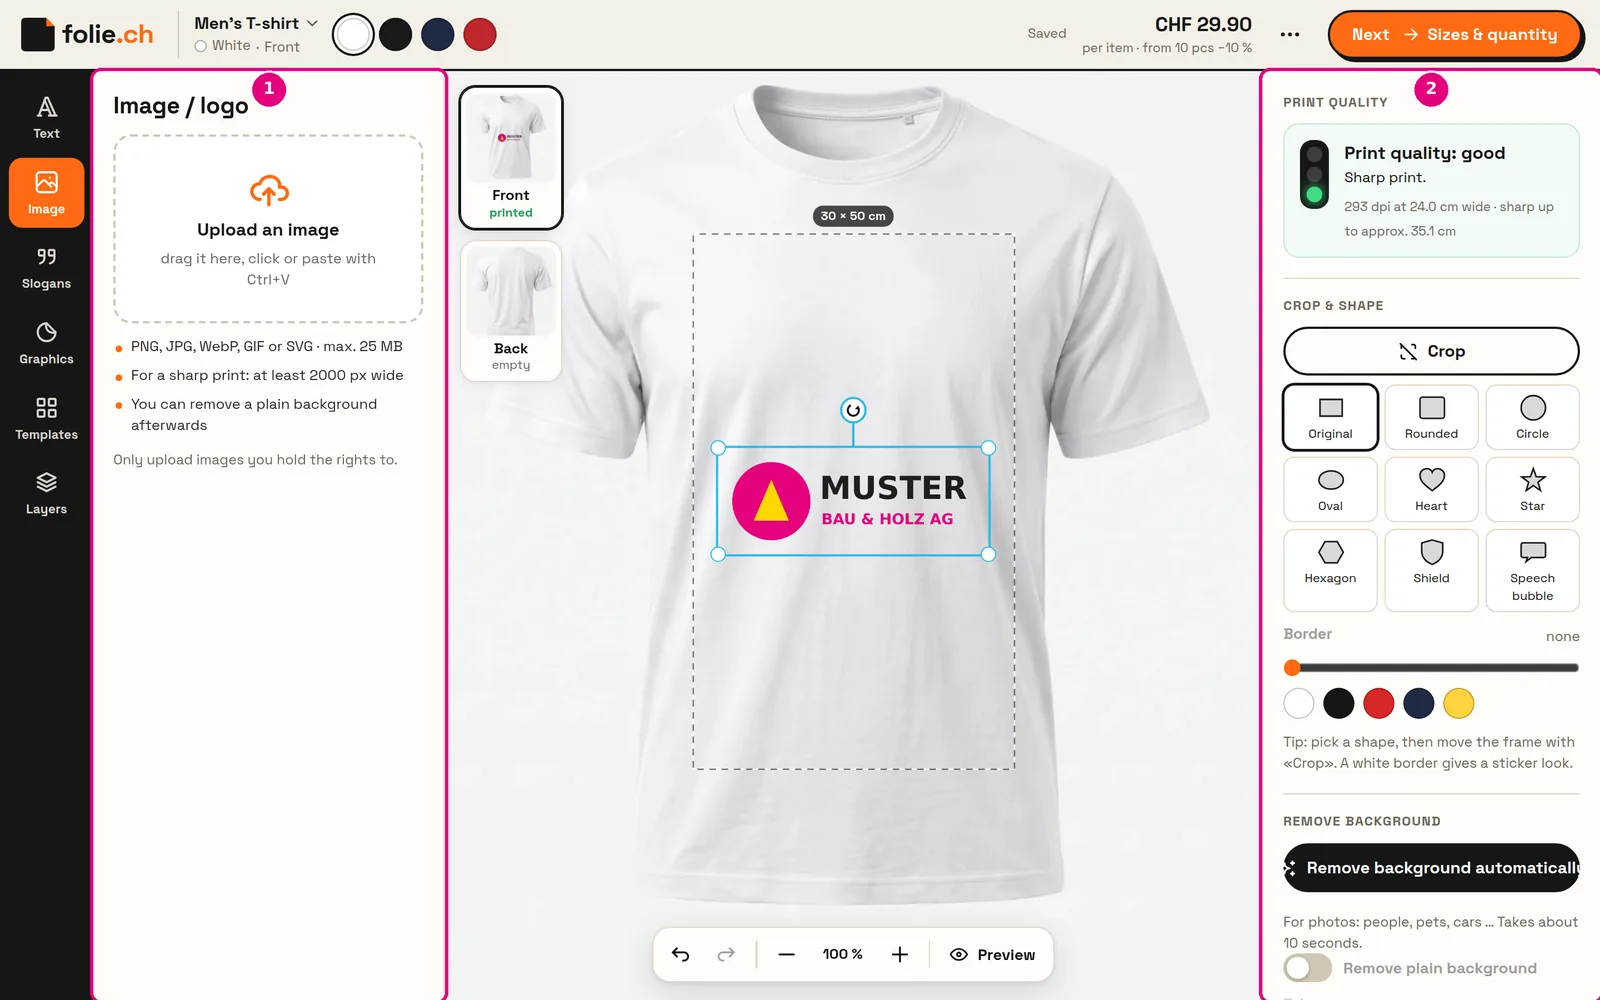
- How it works: “Image” → “Upload an image”, or simply drag the file onto the design area. On a computer you can also paste with Ctrl+V.
- Print quality traffic light: good · OK · too low. If it’s red, make the image smaller or upload a bigger file.
- Remove background: one click on “Remove background automatically” cuts out your logo or photo – important for JPG logos with a white box.
- Best files: SVG for logos (stays sharp at any size), PNG with a transparent background, JPG for photos.
- “YOUR LOGO” box in templates: tap it and upload your logo – it’s placed exactly there. The box itself is never printed.
Slogans – over 14,000 to choose from
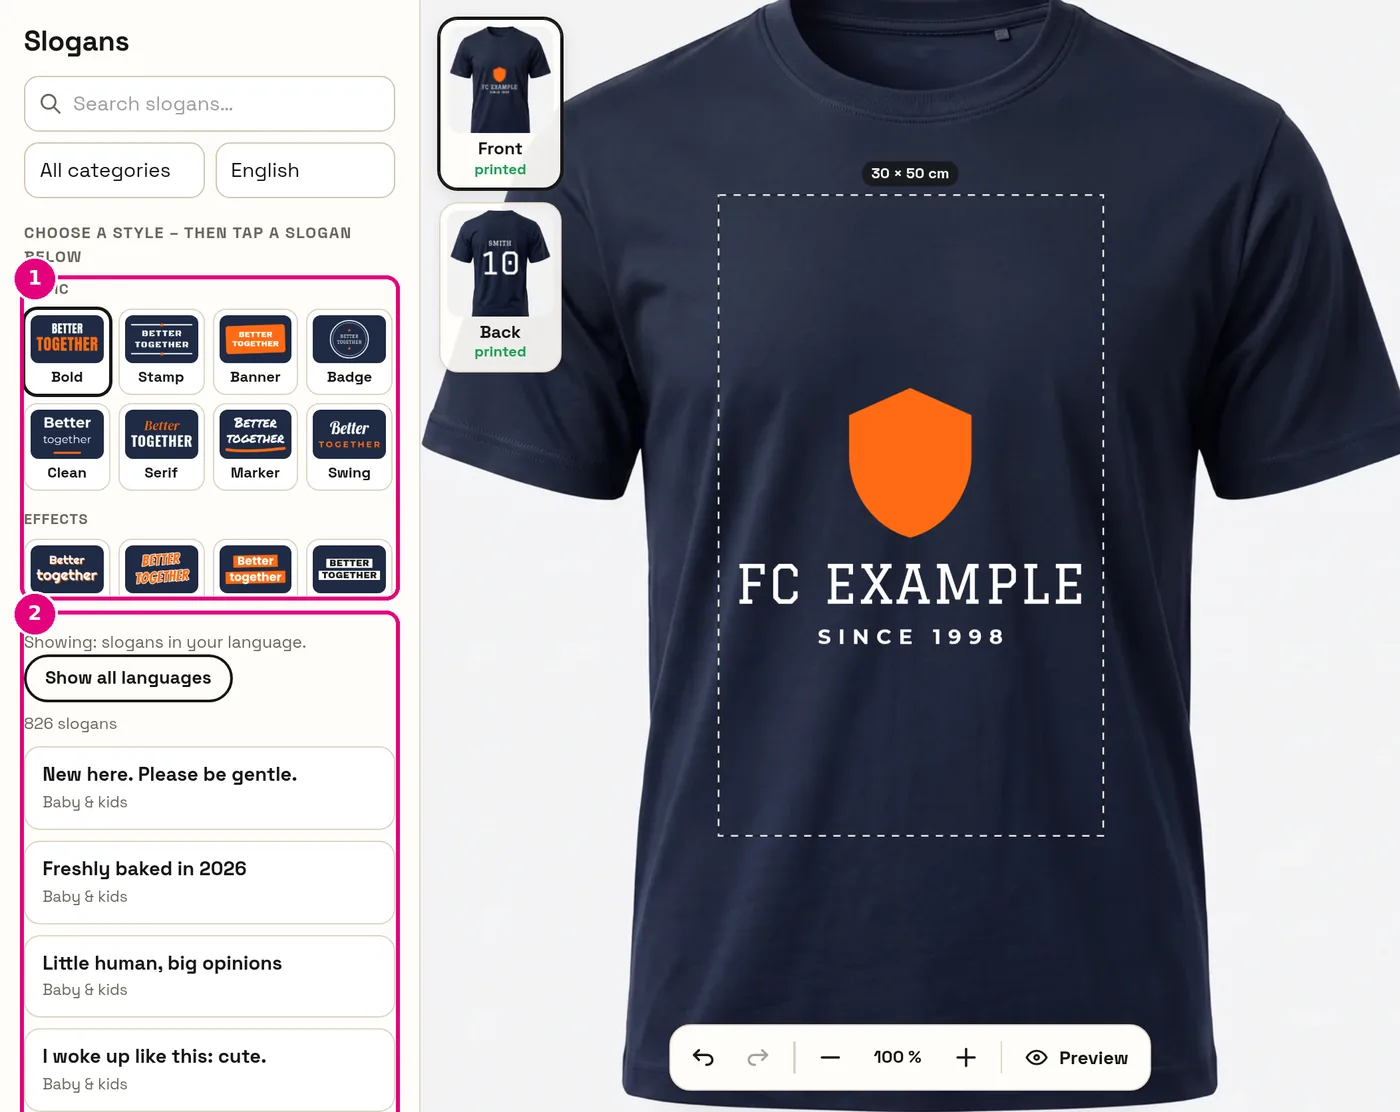
- Tap “Slogans”.
- Optionally choose a style – e.g. College, Retro, Banner or Flowers. This only changes the look.
- Tap a slogan in the list. It appears on the product straight away, in full print quality.
- Finding one: search (e.g. “bike”, “coffee”, “hen party”), category and language (German, Swiss German dialect, French, Italian, English).
- Changing it later: tap the slogan → adjust the text, style or colour. You can also drag a style straight onto the slogan.
Graphics – over 4,000 symbols
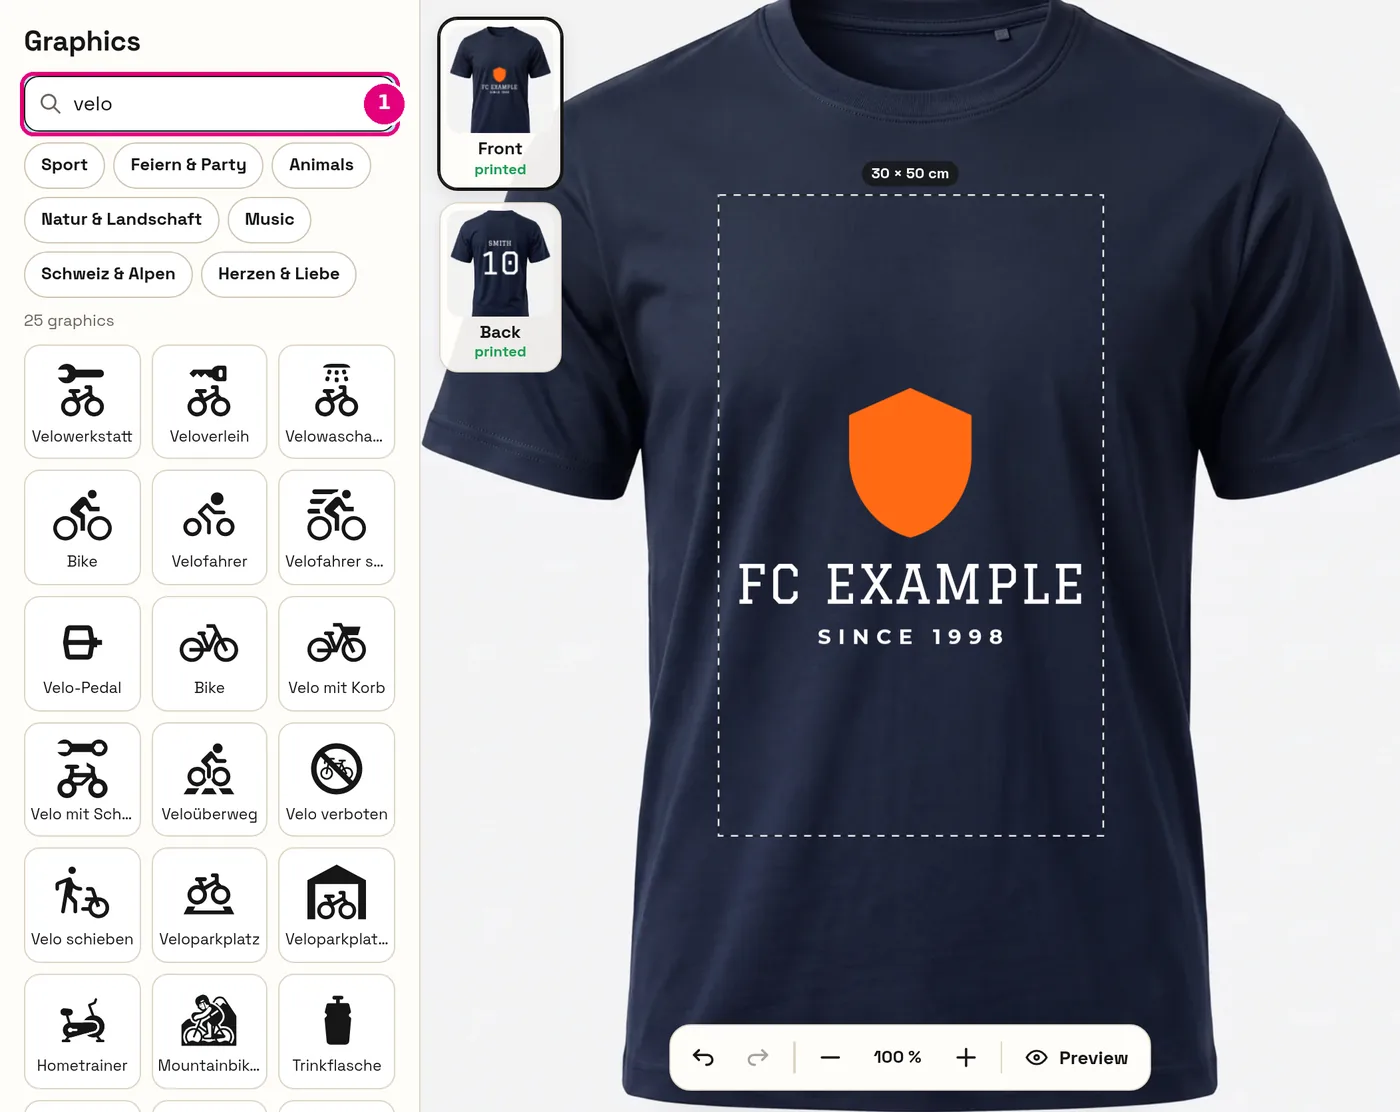
- Tap it or drag it onto the design area – the graphic appears in the centre or wherever you drop it.
- All graphics are single-colour and can be recoloured freely. That makes them suitable for vinyl lettering and stamps too.
- For businesses there are contact symbols (phone, e-mail, web, location), information and prohibition signs, trades, vehicles and much more.
Templates – around 1,200 ready-made designs
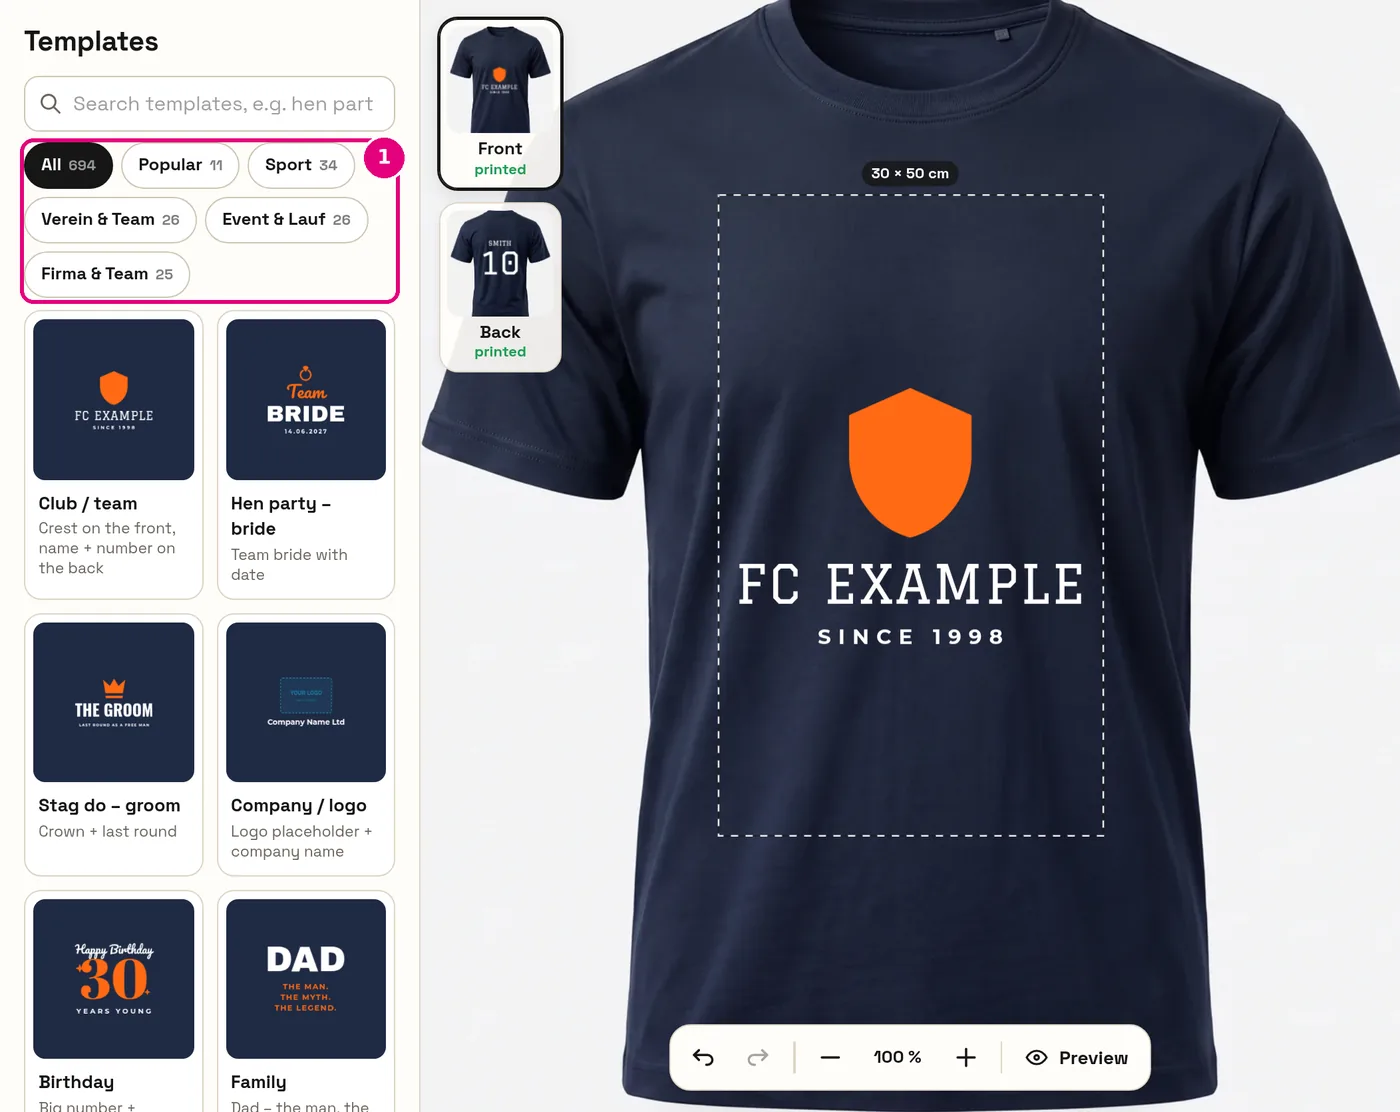
- Matching templates for every product: club & team, hen/stag & wedding, birthday, company, Switzerland, vehicle lettering by trade, company signs, stamps and much more.
- A template replaces your current design. Did it by accident? Just tap “Undo”.
- Then tap each piece of text and change it – name, date, phone number.
Several elements: group, copy, paste
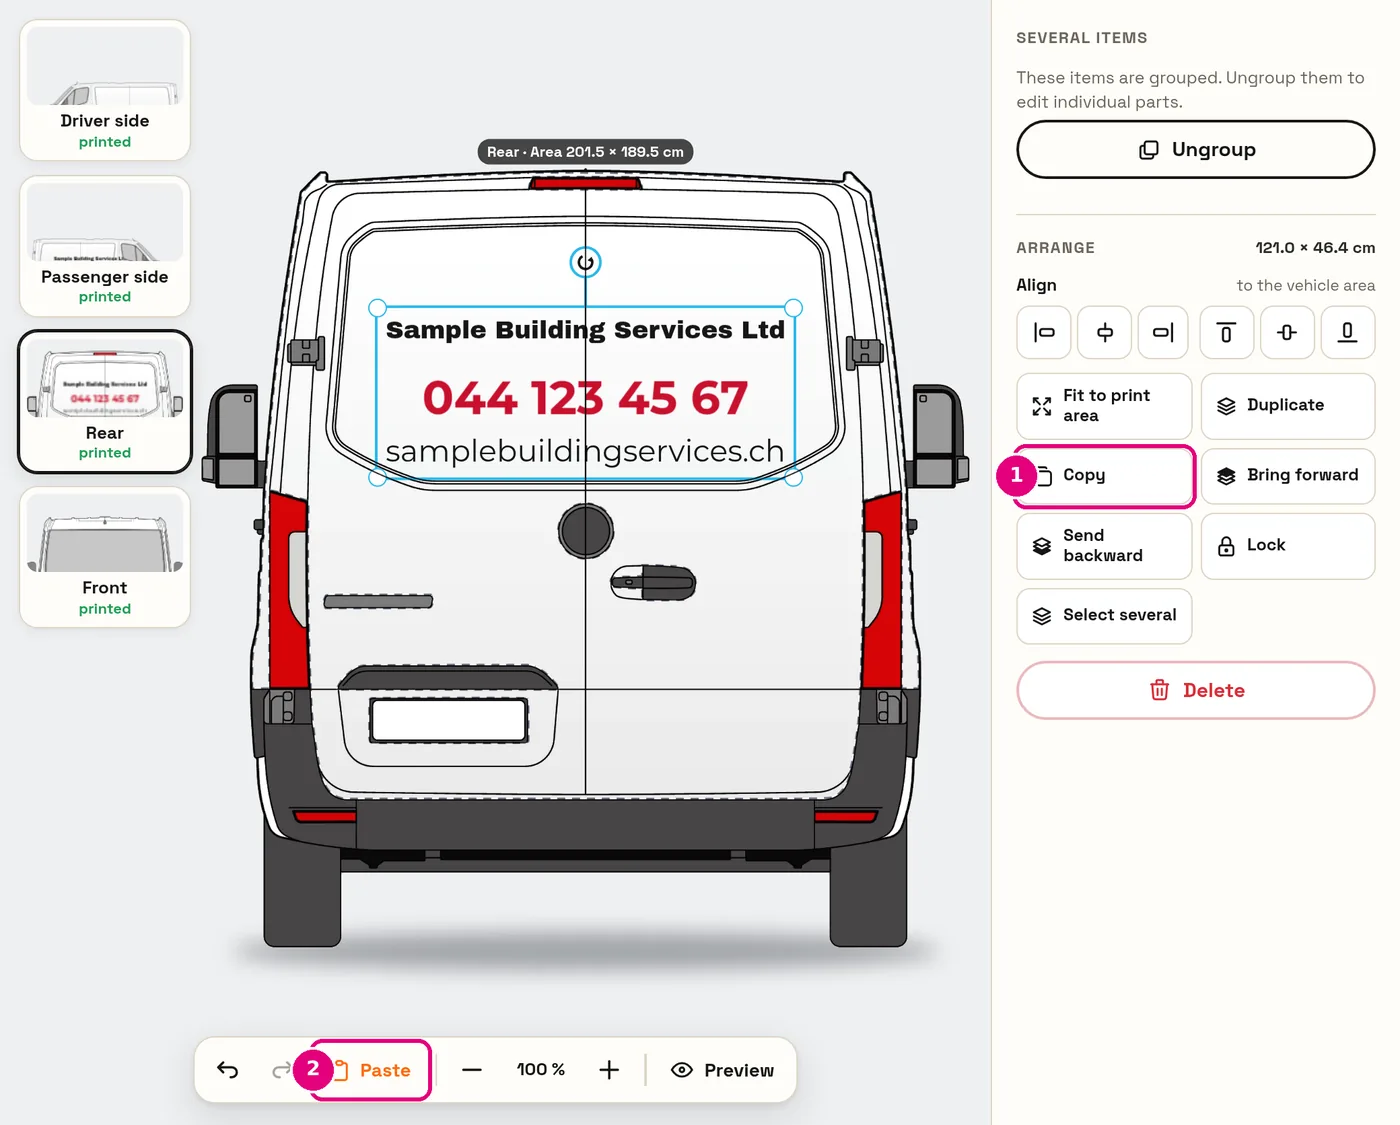
- Select several: Ctrl+A selects everything; to pick individual elements, use “Select several” (under “Arrange”) and tap them one after the other.
- Group: the elements move and scale together – e.g. logo and company name.
- Copy & paste: select the element (or group) → “Copy”, switch to the other side → “Paste” at the bottom. Ideal for carrying something over from the rear to the passenger side, or from front to back.
- Layers: under “Layers” you see all elements and can lock, hide or delete them and change their order by dragging.
Designing vehicle lettering
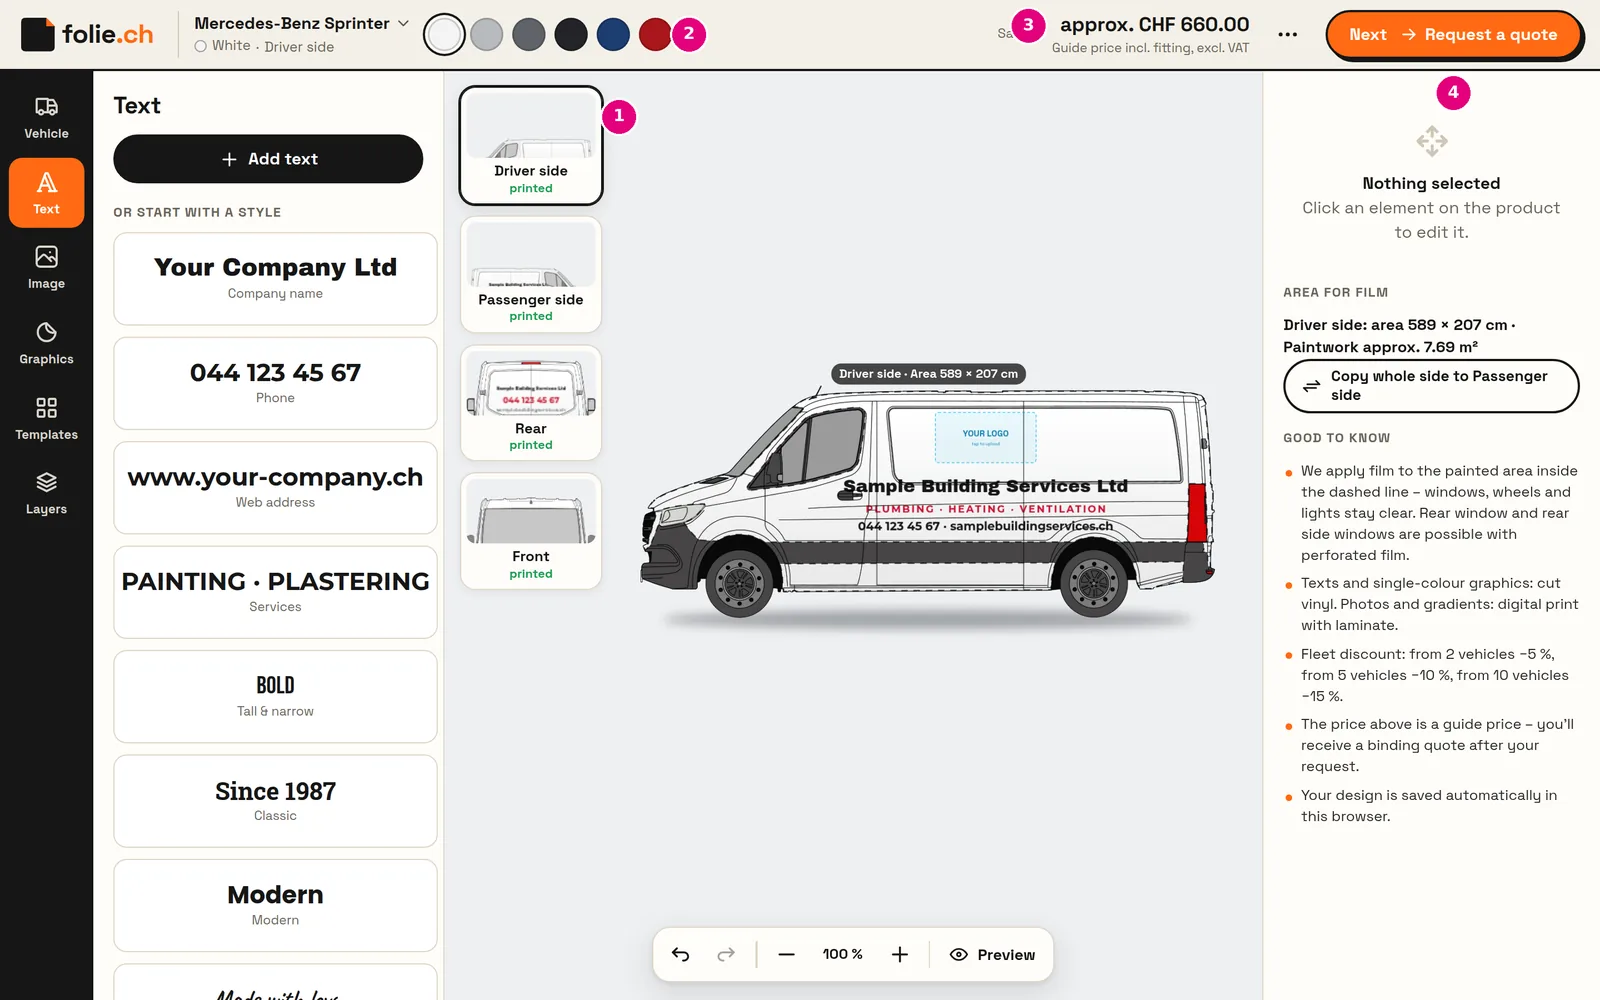
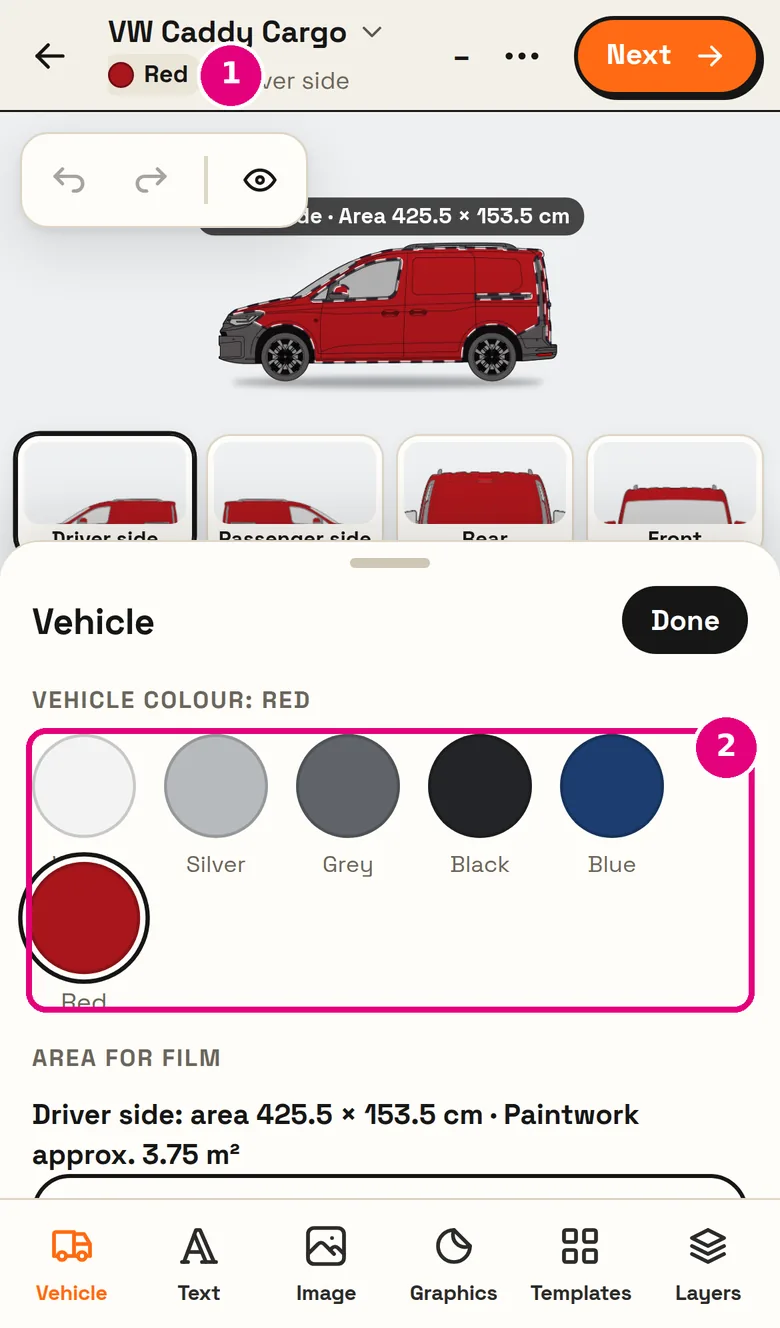
- Choose a vehicle: lots of models, true to scale and growing all the time – vans, estates, pick-ups. Yours isn’t there? Just send us a request.
- Vehicle colour: White, Silver, Grey, Black, Blue or Red – so you can see how the lettering looks on your vehicle.
- Four sides: Driver side, Passenger side, Rear and Front. “Copy whole side to Passenger side” saves you work.
- Paintwork and rear windows: the film goes on the paintwork; windscreen, front windows, wheels and lights stay clear. The rear window and rear side windows are done with perforated film (see below).
- Guide price: calculated instantly from the designed area, fitting included. With “Request a quote” you get a binding quote.
Rear window & rear side windows (perforated film)
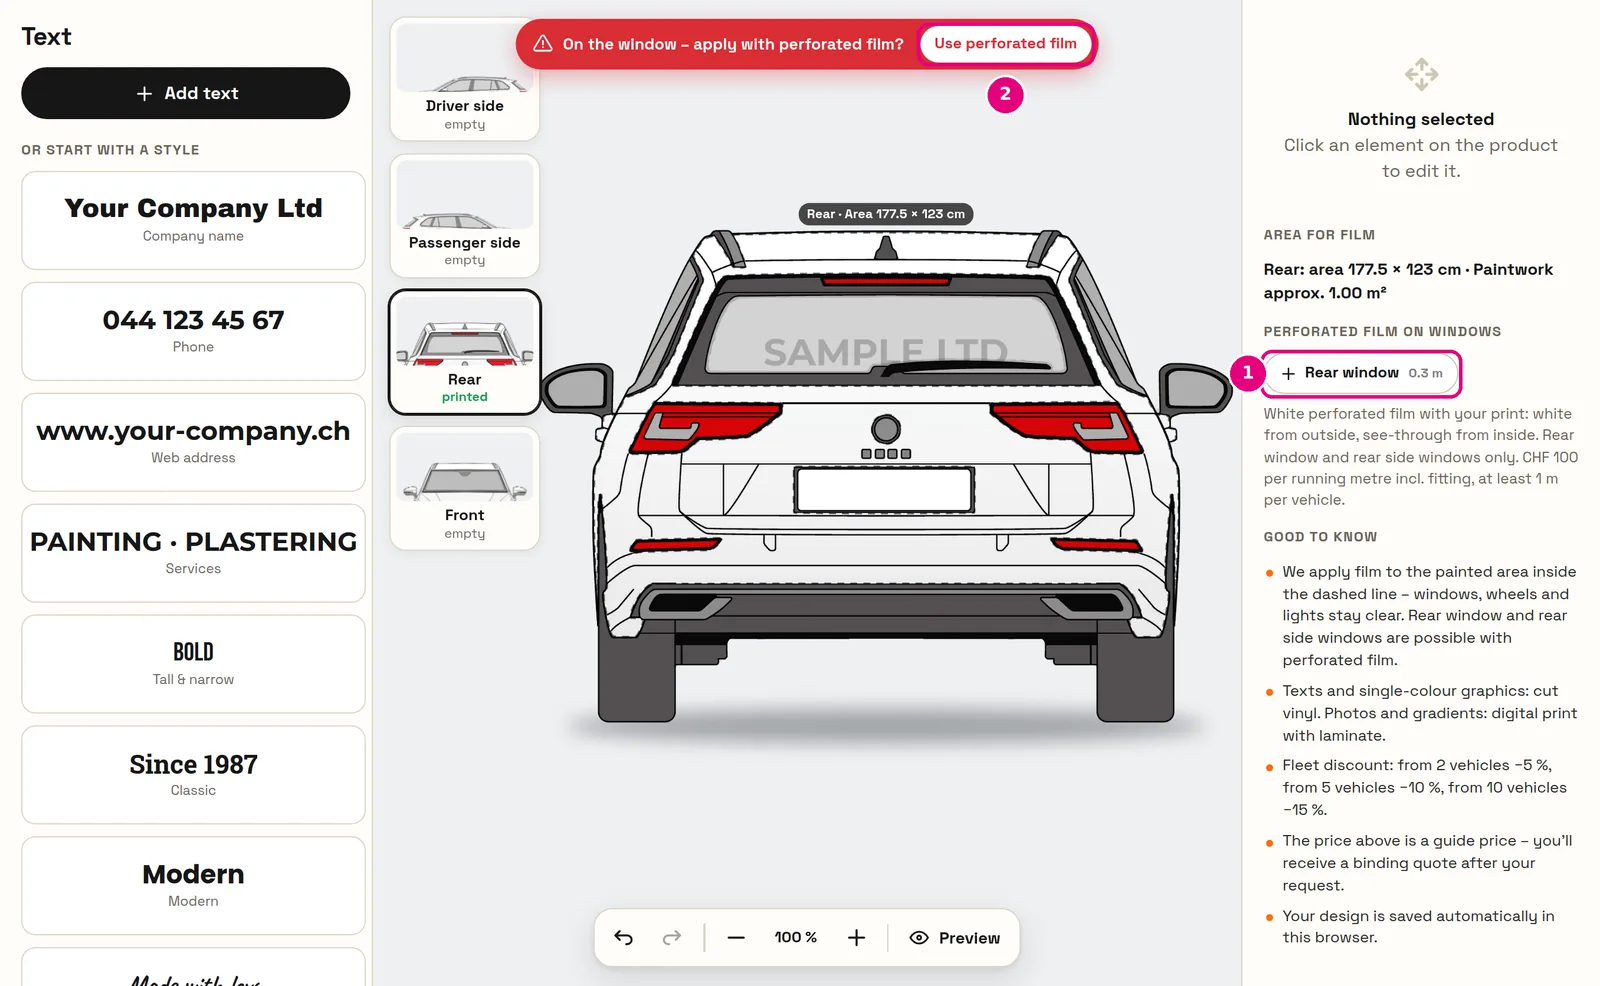
On the rear window and the rear side windows we fit white perforated film printed with your design: white with your logo from the outside, while you can still see through from the inside.
- Switch to the “Rear” view or a side.
- Under “Perforated film on windows”, tap the window (e.g. “Rear window”) – it turns white. On your phone you’ll find this under “Vehicle”, on a computer on the right under “Area for film”.
- Drag your logo or text onto the window.
The windscreen and front side windows are off-limits by law and so can’t be selected. Perforated film costs CHF 100.– per running metre including fitting, at least 1 m per vehicle – the guide price includes it automatically.
Signs, stickers and stamps
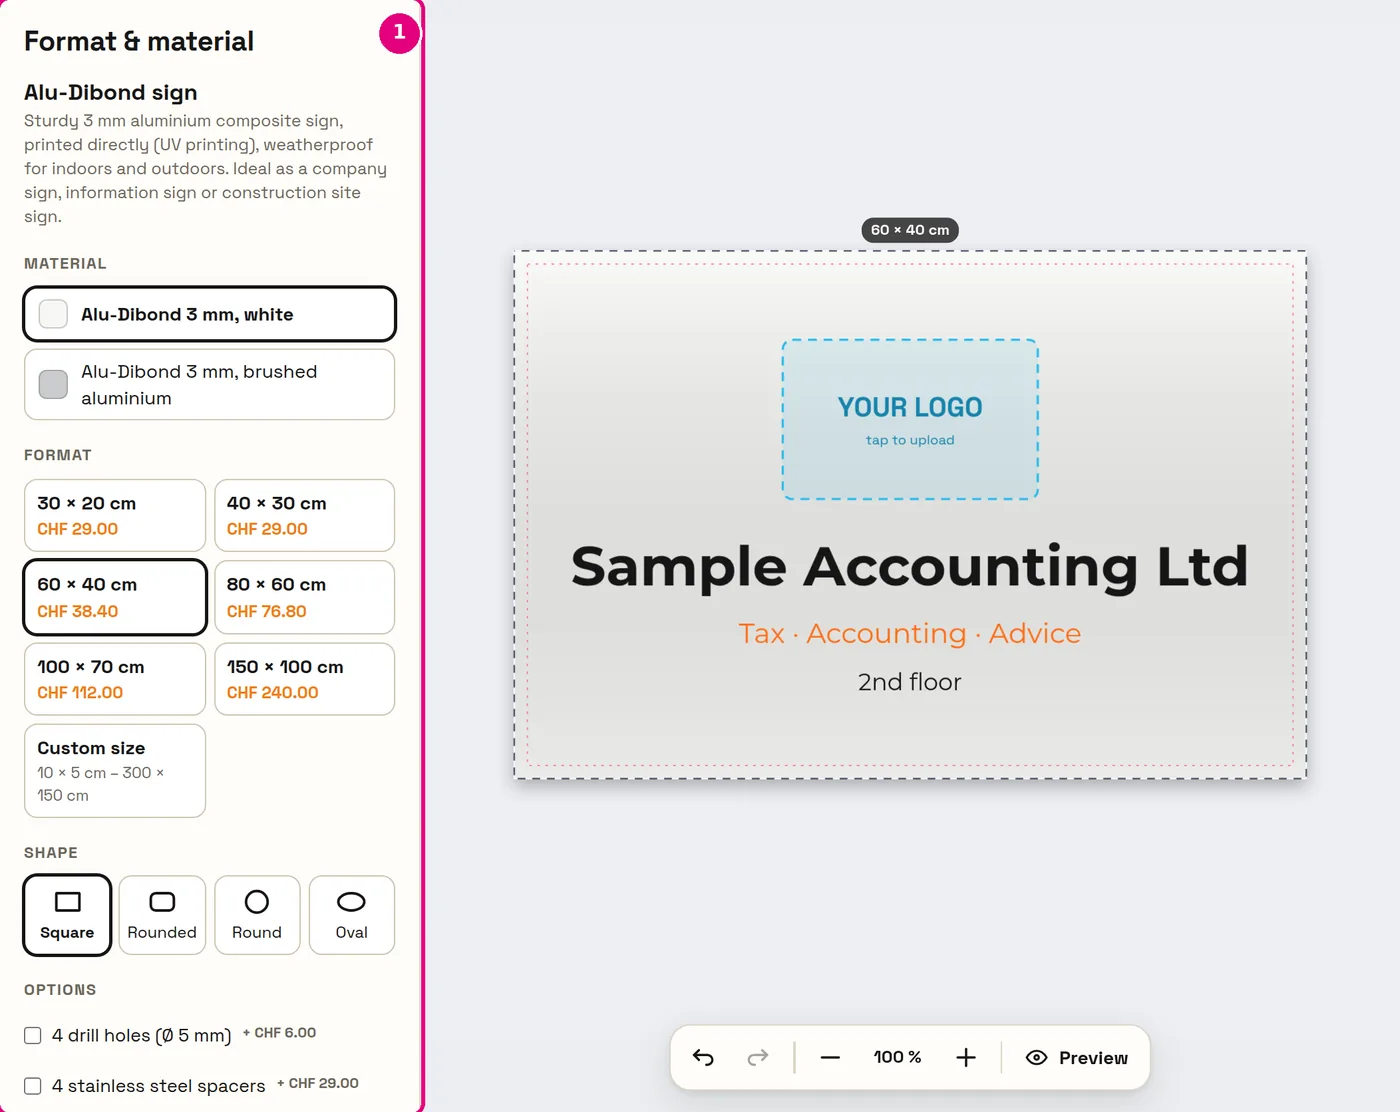
- Format: standard sizes or your own dimensions in centimetres or millimetres.
- Material and shape: e.g. Alu-Dibond, acrylic glass or Forex; square, rounded, round or oval.
- Stamps always print in one colour – everything automatically turns black. Choose bold fonts and lines.
- Vinyl lettering is made of cut letters without a background – no photos, no gradients.
Common mistakes – and how to avoid them
Image too small – blurry print
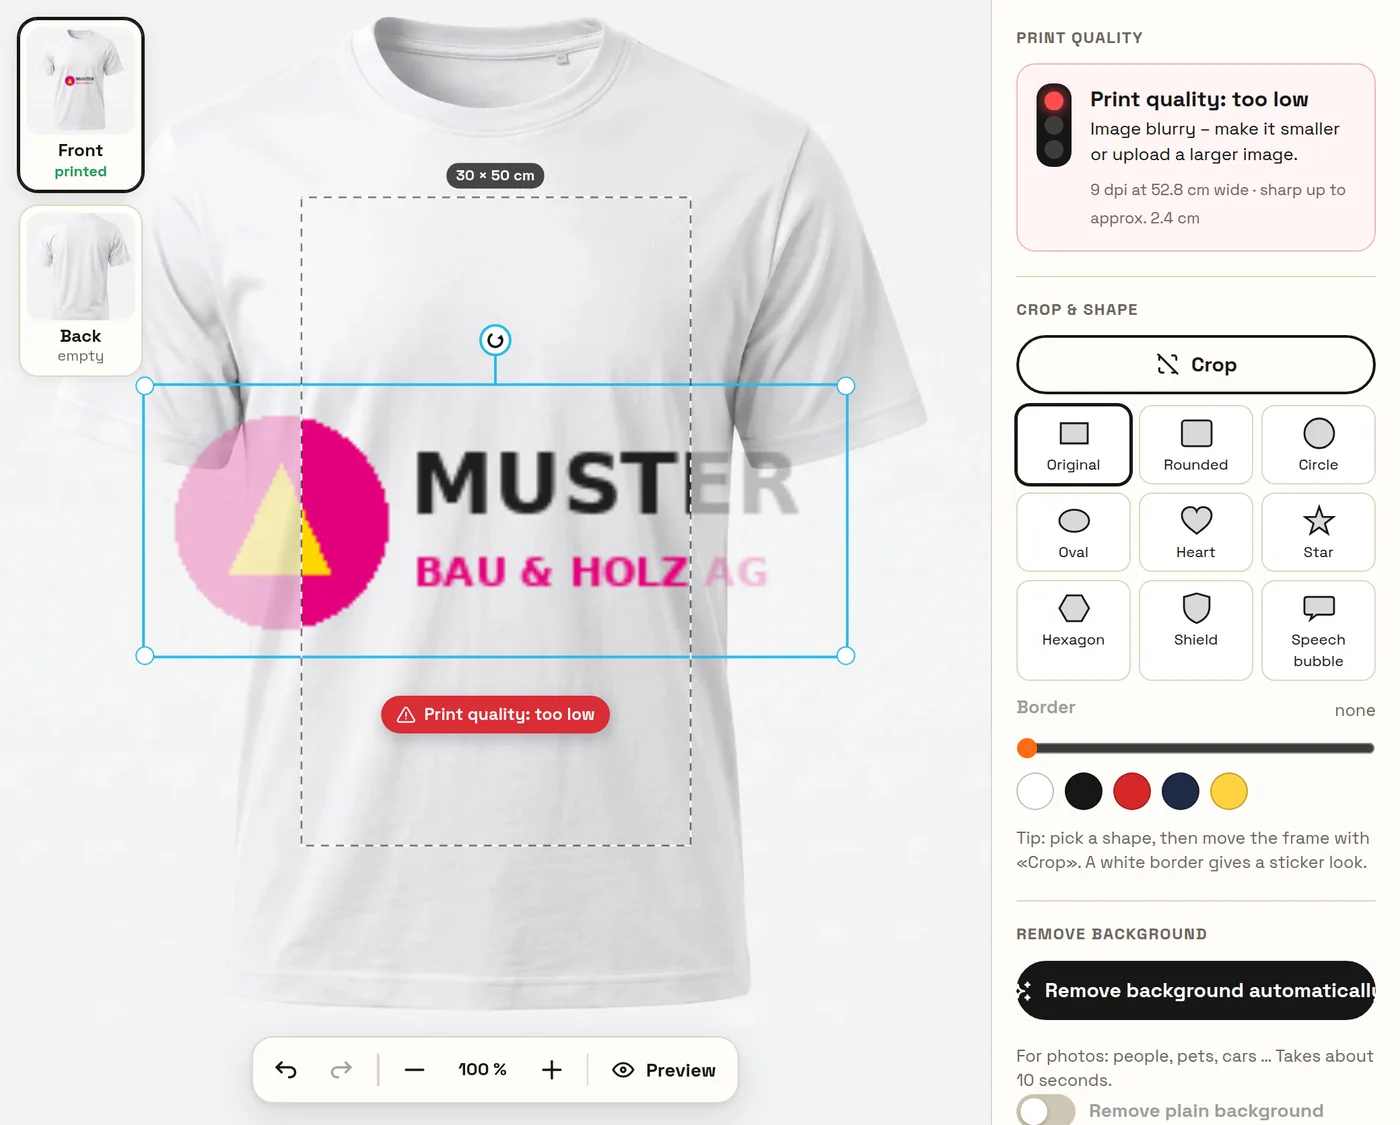
What happens: A small logo (e.g. from an e-mail signature) is stretched to a large size. The traffic light shows “too low”.
How to get it right: Upload a bigger file (ideally SVG, or PNG at least 1500 pixels wide) or make the image smaller until the traffic light turns green.
White box around the logo
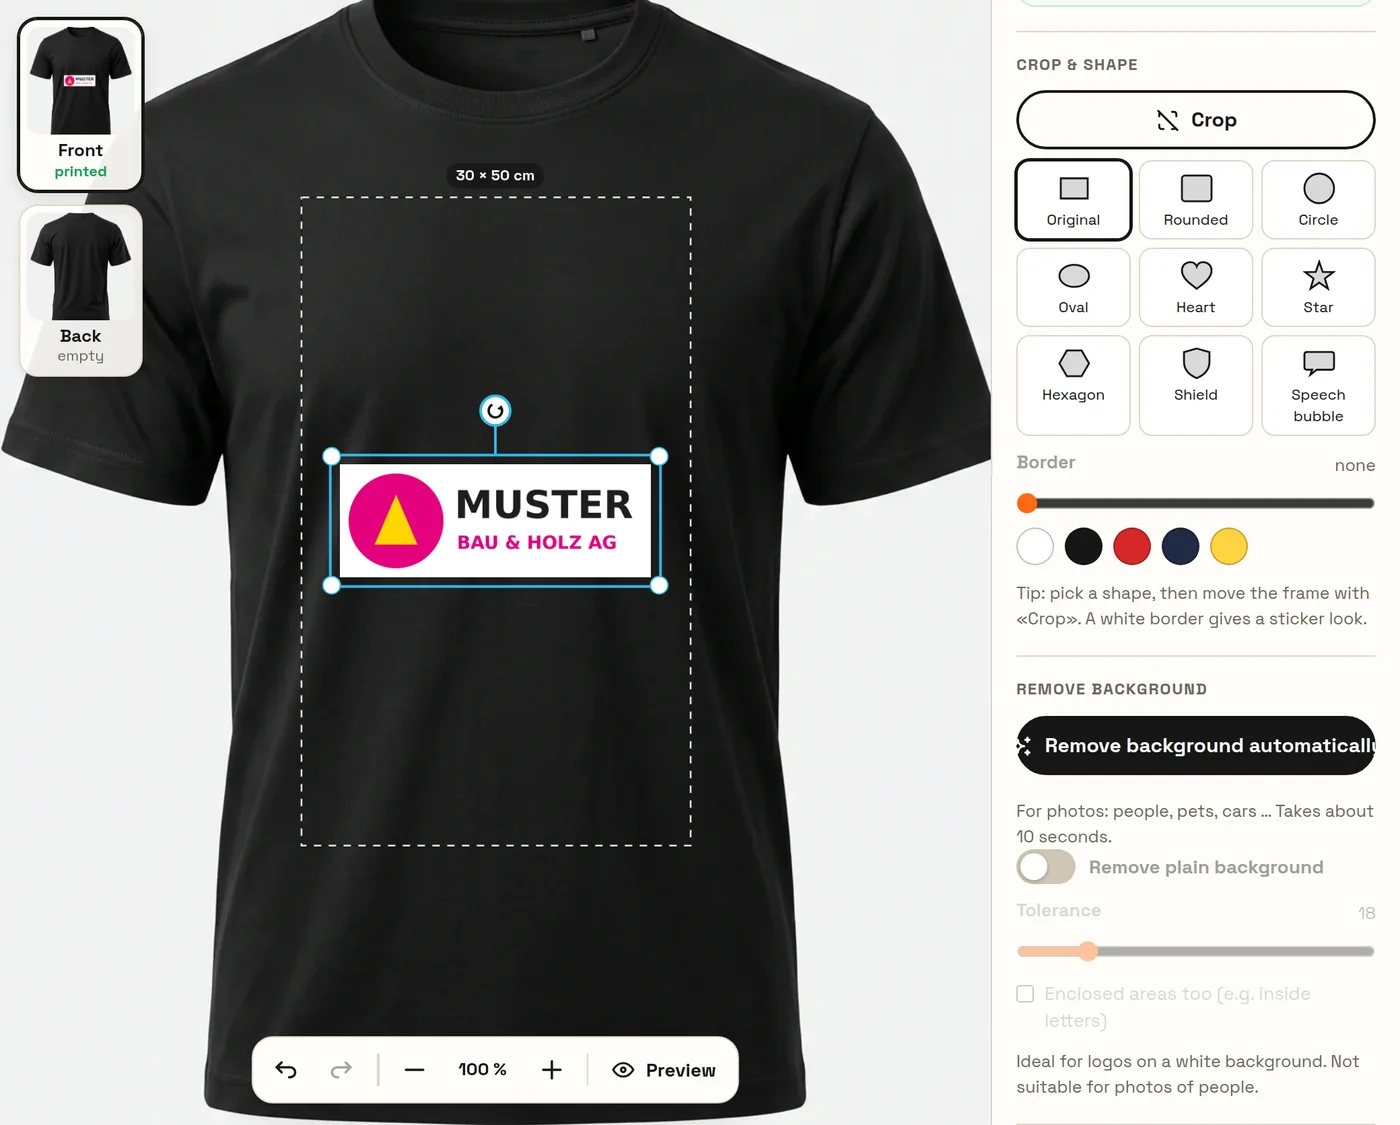
What happens: A JPG logo always has a background – on a dark shirt the white box gets printed too.
How to get it right: Tap the logo → “Remove background automatically”. Or use a PNG/SVG with a transparent background in the first place.
Parts outside the print area
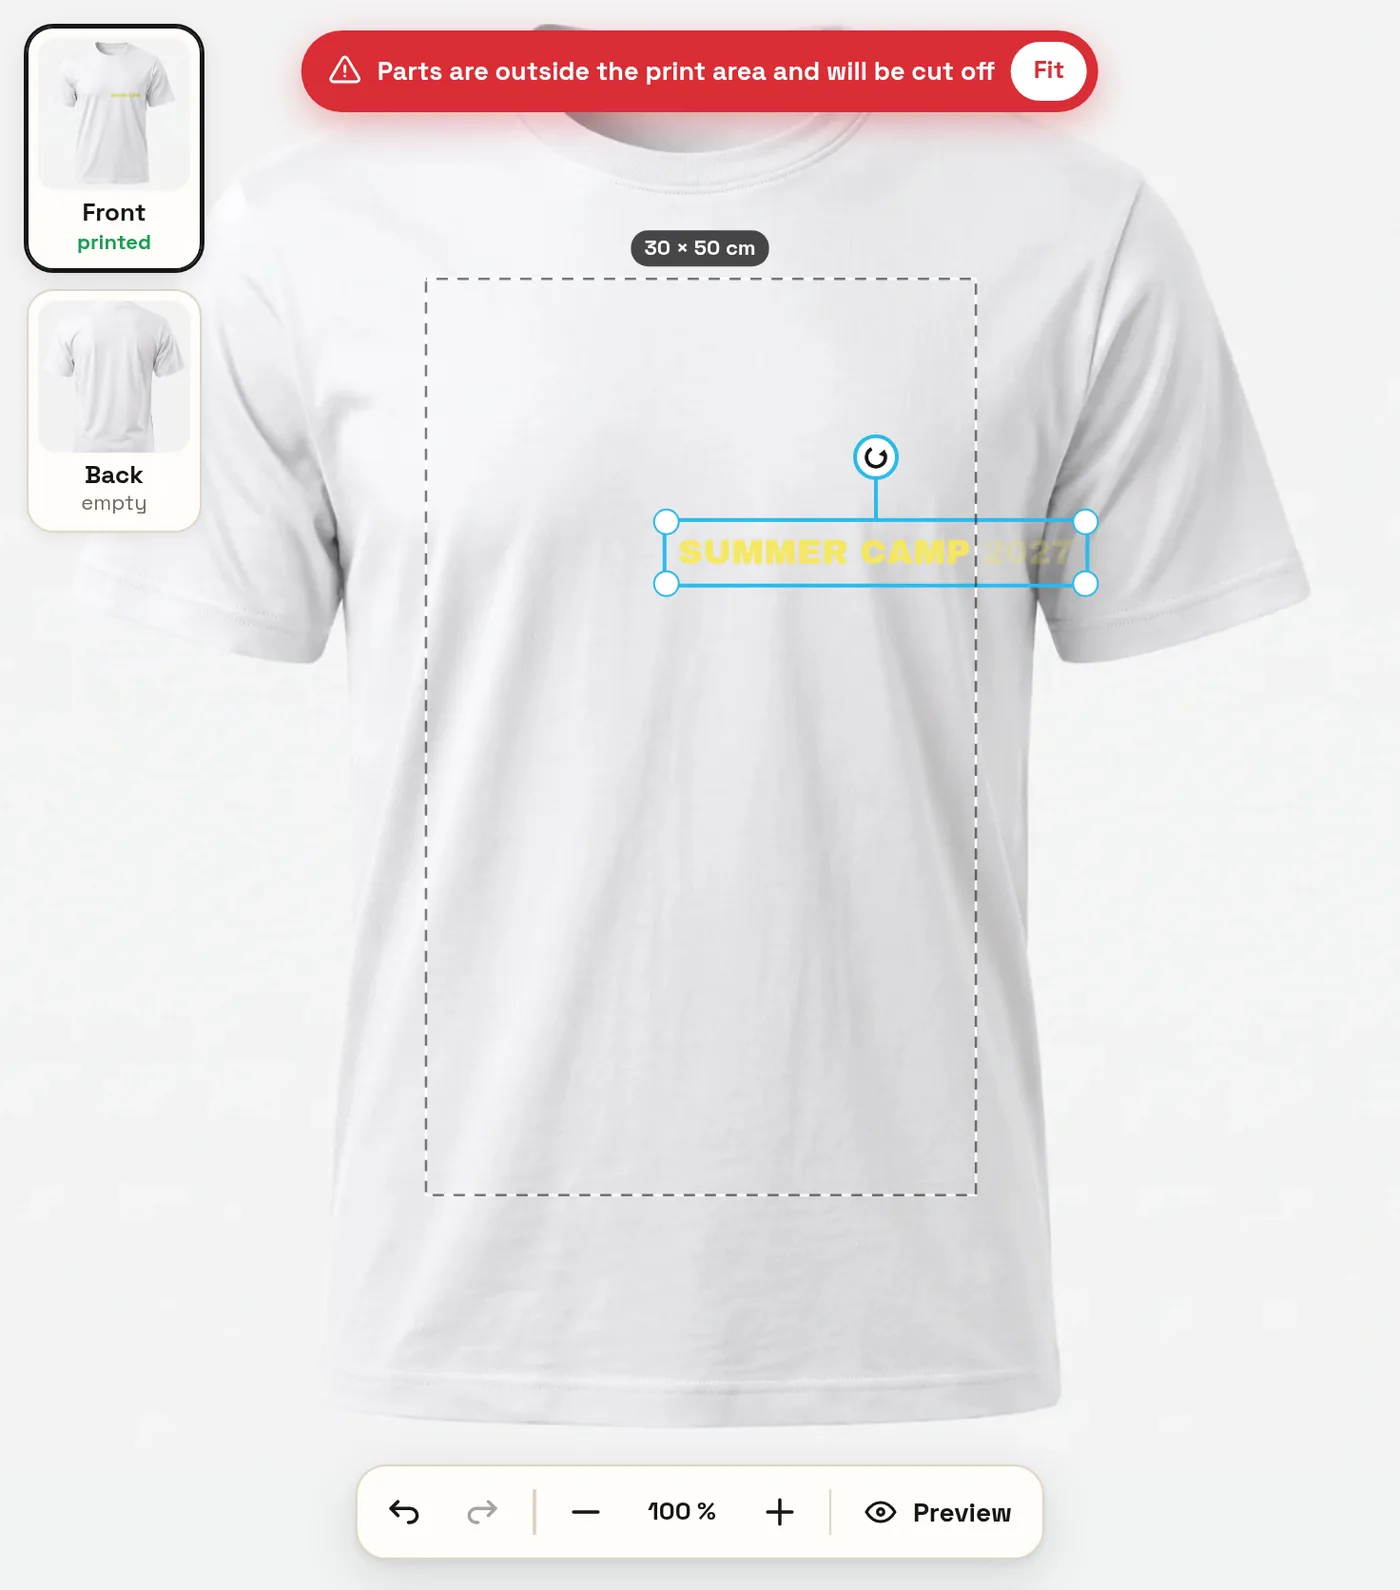
What happens: Anything that sticks out beyond the dashed line gets cut off. A red message appears at the top.
How to get it right: Tap “Fit” in the message, or drag the element back into the area.
Not enough contrast
What happens: Yellow on white, navy on black: it still looks fine on screen, but on the shirt it’s barely legible.
How to get it right: Light colours on dark products, dark colours on light ones. If in doubt, add an outline in a contrasting colour.
Style preview instead of a slogan
What happens: You tap a style picture at the top and wonder why no slogan appears.
How to get it right: The style only sets the look. Tap the slogan further down in the list.
“YOUR LOGO” box left empty
What happens: Templates contain a “YOUR LOGO” box. It is not printed – if you leave it empty, the logo is missing.
How to get it right: Tap the box → “Upload logo”. For vehicles, you can also e-mail us your logo after sending the request.
Typo in the phone number or website
What happens: Two swapped digits can’t be corrected once it’s printed.
How to get it right: Before ordering, read all the text twice in the preview – ideally out loud.
Font too thin for stamps and vinyl lettering
What happens: Thin lines and tiny letters don’t stamp cleanly and are hard to apply as vinyl.
How to get it right: Bold fonts, not too small: for vinyl lettering, a letter height of at least about 1 cm.
Vehicle: text over a window or handle
What happens: Anything on glass, rubber seals or handles doesn’t get film and will be missing.
How to get it right: Place text on clear areas of paintwork. The dashed line shows where film can be applied.
Looking for your design on another device
What happens: Designs are saved in the browser – on your phone you won’t see the design from your computer.
How to get it right: Carry on using the same device. For company projects we can also prepare drafts for you – you’ll then find them under My account → My drafts.
Keyboard shortcuts on a computer
| Ctrl+Z / Ctrl+Y | Undo / Redo |
| Ctrl+C · Ctrl+X · Ctrl+V | Copy · Cut · Paste (also onto another side) |
| Ctrl+D | Duplicate |
| Ctrl+A | Select all |
| Ctrl+G / Shift+Ctrl+G | Group / Ungroup |
| Arrow keys (with Shift 10×) | Move element |
| Delete · Esc | Delete · Deselect |
On a Mac, use the ⌘ key instead of Ctrl.
How it works
- DesignPlace text, a logo or a photo in the online designer – on your phone or computer, no account needed.
- See the priceChoose size, material and quantity – the price updates live, incl. volume discount.
- OrderPay by card, Apple Pay, Google Pay or QR bill. We check every file.
- Produced in WallisellenShipped by post anywhere in Switzerland, or collect for free in Wallisellen.
Frequently asked questions
Do I need an account to design?
No. The designer runs in your browser on phone and computer, without registering. Your design is saved automatically in your browser.
Why doesn’t my slogan appear on the shirt?
You probably tapped a style. The style pictures are only previews – tap the slogan you want further down in the list.
What does “Print quality: too low” mean?
Your image has too few pixels for this size and would print blurry. Make it smaller or upload a bigger file (ideally SVG or a large PNG).
How do I remove the white background from my logo?
Tap the logo and choose “Remove background automatically”. Then check the edges in the preview.
Can I copy something from one side to the other?
Yes: select the element or group, “Copy” (Ctrl+C), switch sides and “Paste” (Ctrl+V). The real size is kept.
Can I change the vehicle colour?
Yes. For vehicles you can choose White, Silver, Grey, Black, Blue or Red – on a computer at the top next to the vehicle name, on a phone via the colour dot.
Is my design checked before printing?
Yes, every file is checked before production in Wallisellen. If anything is unclear, we get in touch before we print.
Goes well with
One design – everything branded: in the designer you transfer your design to any other product with one click.
Questions? Give us a call or drop by.
Foliencenter GmbH · Gewerbehallenstrasse 4, 8304 Wallisellen
Mon – Fri 08.00 – 16.00, please give us a quick call before you visit.
Last updated: